How Long Does an Injection Mold Last? Mold Life by Class, Material, and Care
The mold is often the biggest check you’ll write on a plastic part project. So it’s fair to ask how many parts it will give you. Will it cover your…

Your first sample parts just came back. They look right until you tilt one toward the light. Then you see it: a shallow dent sitting right over a rib.
Nothing is broken. But the part doesn’t look finished. Now you’re wondering who’s at fault: your design, the mold, or the press.
That dent is a sink mark, and its causes can be fixed. Sink is one of the things we look for during mold sampling and testing. At T1, the first-shot stage, we run short fills, full shots, and packed parts. That shows where sink, flash, or warp appears.
In this guide, we explain what sink marks in injection molding are and why they form. You’ll also learn how to stop them before the mold is ever cut.
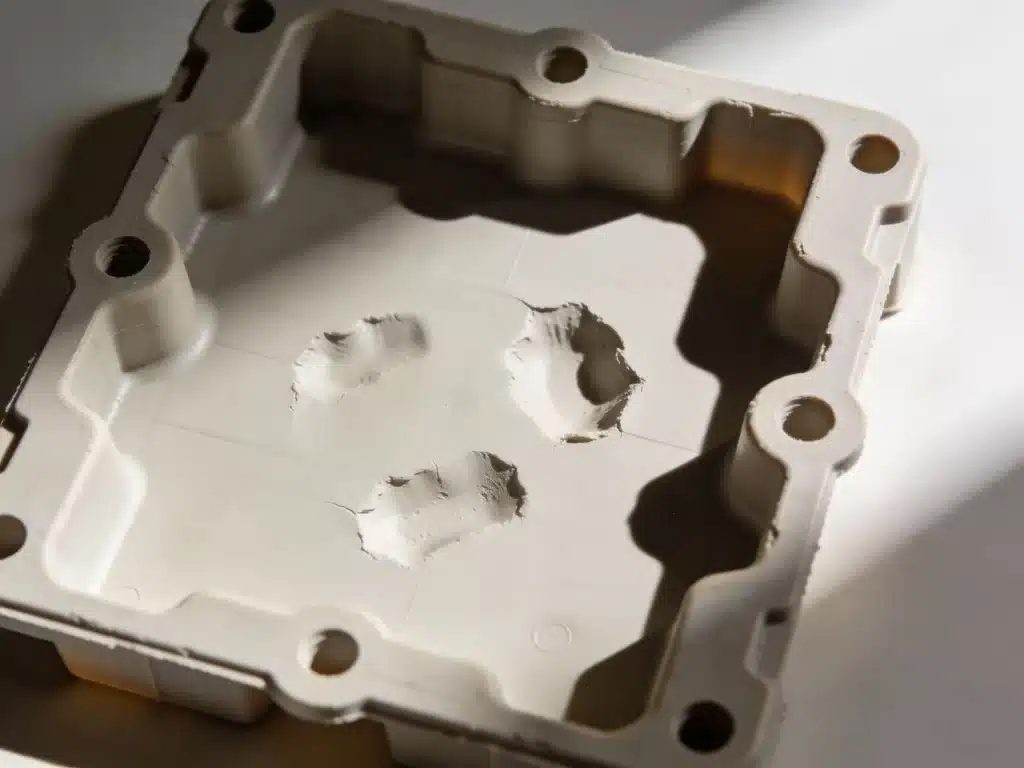
A sink mark is a small dent or dip on the surface of a molded plastic part. It forms over thick areas, like where a rib or boss meets a wall. As the part cools, the outer skin hardens first. The thicker center keeps shrinking and pulls the surface inward.
Sink marks usually come from three places:
Many sink marks are only cosmetic. Deep ones can affect fit, flatness, and sealing.
Sink starts with how plastic cools. Thick sections cool slower than thin ones. The outer skin sets first, and the core keeps shrinking after it. That shrinking core pulls the surface inward.
Standard injection molding references describe sink the same way: a local dent in thicker zones. How much a resin shrinks plays a part too. Our guide on the typical shrinkage rate in injection molding covers the basics.
| Cause | Example | Who fixes it |
| Design | Thick or uneven walls; ribs and bosses that are too thick | Part designer, ideally during DFM review |
| Process | Low pack or hold pressure; short hold time; gate freezes too early | Molder, on the press |
| Cooling | Uneven mold cooling; areas of the mold that run hotter | Molder and toolmaker |
| Material | A resin that shrinks a lot | Designer and molder, when choosing the resin |
Design. A thick wall or an oversized rib holds more hot plastic. That extra plastic keeps shrinking after the thinner areas have set.
Process. Pack and hold pressure push more plastic into the mold as the part shrinks. If that pressure is too low or ends too soon, thick areas come up short. The same thing happens when the gate freezes before those areas are packed.
Cooling. Mold cooling plays a role too. If one area of the mold runs hotter, the plastic there cools slower and sinks more.
Material. Semi-crystalline resins, like nylon and polypropylene, shrink more than amorphous resins like ABS. That makes them more prone to sink.
Now that you know why sink forms, the next question is where to look for it on your part. Sink lands over the thickest spots. Light hitting the surface at an angle shows shallow sink better than light shining straight on. Check these areas first:
Watch whether the sink moves. Say it shows up in the same spot every time, and more hold pressure barely helps. Then the cause is likely the mold cooling or the part design.
Sink often gets confused with two other defects that share the same root cause. Knowing which one you have keeps you from chasing the wrong fix.
| Defect | What it looks like | Where | Root cause |
| Sink mark | A shallow dent on the surface | Over thick areas, like ribs and bosses | The core shrinks and pulls the skin inward |
| Void | A hidden bubble inside the part | Inside thick sections | The skin stays rigid, and the core shrinks away from it |
| Warping | The part bends or twists out of shape | Across a large area or the whole part | Different areas shrink at different rates |
All three start with uneven shrinkage. That’s why the fixes overlap. More even walls help with all three.
A void can hide behind a clean surface. Suspect one if your part looks fine but seems weaker than it should. Cutting a part open or scanning it with X-ray CT will show it.
For a wider look at other problems, see our guide to the most common plastic molding defects.
The best time to stop sink is in your CAD model, before any steel is cut. Run your part against this checklist:
Here’s how the rib guideline works on a real wall. On a 0.100-inch wall, ribs at 40–60% come out to 0.040–0.060 inches thick.
For more on getting your part ready, see our guide on design considerations before you send your part to a molder.
Design is the best place to stop sink. But if the mold is already built, there’s still a lot a molder can do. These fixes run roughly from quickest to most involved:
Sometimes sink stays in the same spot even after hold pressure goes up. In that case, check the cooling system before you keep adjusting machine settings.
Process changes also have limits. They can reduce sink caused by the design, but they can’t fully remove it. If a wall is too thick, the real fix lives in the part design.
It depends on where the sink is and what your part has to do. Some sink only affects looks. Other sink affects how the part works.
| Cosmetic sink | Functional sink |
| Shows on surfaces people see | Affects how the part performs |
| Matters on consumer housings and visible panels | Matters on flat faces, sealing surfaces, and mating parts |
| A matte texture can sometimes hide it | It can weaken a gasket seal, shift mounting holes, or loosen a snap fit |
Either way, timing matters. A change on paper is cheap. A change after the steel is cut is not.
Before tooling starts, agree on a cosmetic standard with your molder. Decide which faces are A-side, the ones that must look clean. Then everyone knows where sink matters most.
Not sure if your ribs or bosses are too thick? Send us your CAD instead!
A DFM review before tooling is the best place to catch sink. At Freeform Polymers, our design for manufacturability review happens before any steel is cut. We look at:
Rib and wall geometry is one of the first things we check. That way, sink gets caught on paper instead of in steel.
We’re an ISO 9001:2015 certified shop. Design, mold work, and production all happen under one roof. When a part shows sink, our tool room is down the hall, not across an ocean.
We work with customers across Utah and beyond.. So when you’re ready, contact us or call us at (435) 774-9090 to get things started!